KDS Profiles
Hospitality > Display stations > Profiles
The KDS profiles define the look of the display station and the chits/lines, the functionality and operations of the display station. They are devided as follows:
The KDS Display Profile defines if the display station is a chit display or a line display. You design lines and columns for each display profile.
To create a display profile
-
In Site Manager, go to Hospitality > Configurations > Display profiles. Here you can create a new display profile and view existing display profiles. Double click a line to go to its configuration.
-
When the profile has been selected, under Display profile tab, you select if you want your display mode to be Chit display or Line display.
- Under Display lines tab, you can then configure the lines and columns for the display profile.
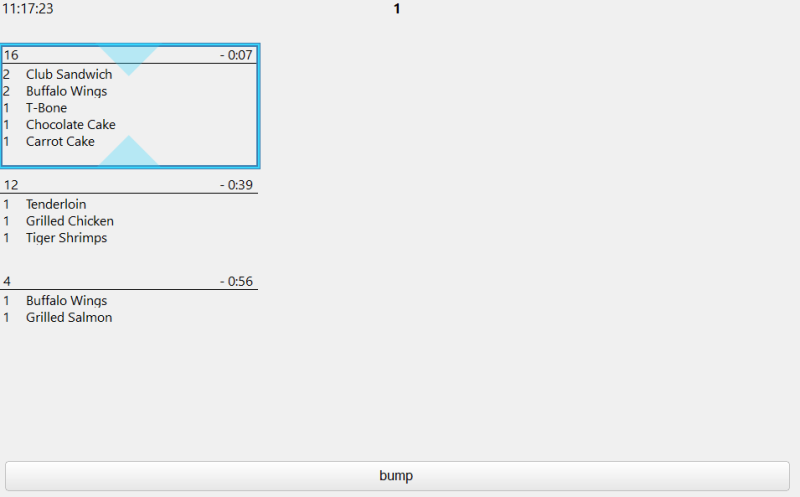
Example of a Chit display:

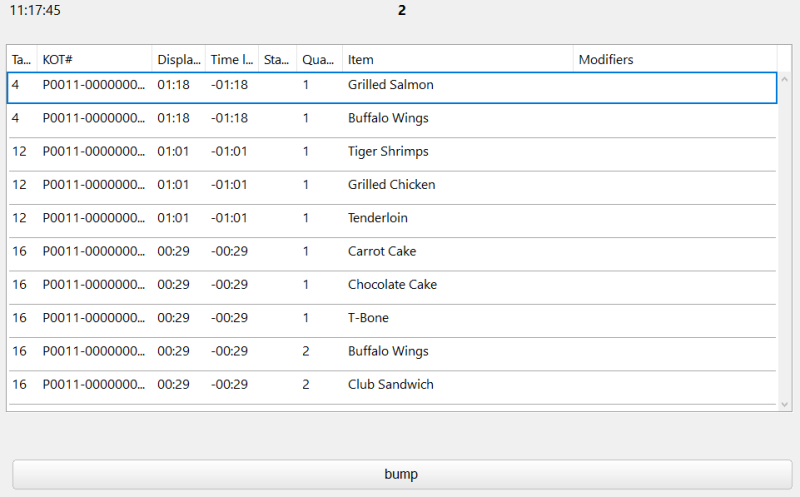
Example of Line display:

The KDS Functional Profile defines how the display station behaves.
To create a functional profile:
-
In Site Manager go to Hospitality > Configurations > Functional profiles. Here you can create a new functional profile and view existing functional profiles. Double click a line to go to its configuration
When you have selected a functional profile you choose which button profile you want to use for the display station that is defined in the KDS Button Profiles. You will also need to specify:
-
where recalled orders should appear on the display station
-
where done orders should appear on the display station
| Fields & buttons | Description |
|---|---|
| Description | Contains the name of the profile. |
| Buttons | Contains the ID of the buttons menu that is in use for the profile. The possibilities are the button menus that have been defined in the button profiles. |
| Bump possible |
Shows when bumping is possible when this profile is in use. The options are:
|
| Recalled orders appear |
Indicates where orders that have been recalled appear when this profile is in use. The options are:
|
| Sound on new order | Indicates whether a sound is prompted when a new order appears on the KDS. |
| Done orders appear |
Indicates where orders that are done appear when this profile is in use. The options are:
|
| Autobump after |
Only applies when Display Station Type Customer Facing Display is used.
|
The KDS Button Profile controls the operations that a display station can perform. Each display station has to define which operations it supports. A button profile is attached to a KDS Functional Profile.
To create a button profile:
-
In Site Manager go to Hospitality > Configurations > Button profiles. When you create a new button profile you define the number of buttons, which indicate the number of operations that are needed for each display station. The display stations appear below.
-
When you have created the button profile, you must configure the operations by double clicking on the button line, or select the edit button.
-
In the Key Mapping field you select which keyboard input should trigger the button. On the keyboard, you press a key that you want to assign to the button key mapping.
-
In the Operation field you select which operation should run.
The KDS Visual Profile defines how and what a display station displays. It defines certain user interface elements for the display station.
To create a visual profile:
- In Site Manager go to Hospitality > Configurations > Style profiles. Here you can create a new visual profile and view existing visual profiles. Double click a line to go into its configuration.
- When you have created the visual profile, you can configure the operations by double clicking on a line, or select the edit button.
Inside the visual profile configurations, under the General tab, you define how many columns and rows you want the chit to display. In the Chit Refresh Rate field you define how many minutes you want to pass until the chit refreshes itself. The Chit Size field is used when Number of Rows is more than 1.
Under the Layout tab, you design the layout of the display station and make special configurations to header, buttons, aggregates and history panes. You can design where your panes are located, their size, positions and other configurations.
The KDS Style Profile defines the look of the chits and the lines, for example the font, font size, and color.
To create a style profile:
-
In Site Manager go to Hospitality > Configurations > Style profiles. Here you can create a new style profile and view existing style profiles. Double click a line to go to its configuration
- When you have created the style profile, you can configure the operations by double clicking on a line, or select the edit button.
Inside the style profile configurations, you can create specific configurations for Orders, Items, Modifiers, Header and footer and Deals.
- Orders:Here you can configure style for the order lines (not header and footer) and the pane behind the chit or line display. It has two styles, order style and order pane style.
-
Items: Here you can configure styles for items. It has five styles, which are Item default, on time, done, modified, modified and rush.
-
Modifiers: Here you can configure styles for item modifiers. It has ten styles, normal, modified, increase, heavy, decrease, light, comment, voided, only and done.
- Header and footer:Here you can configure styles for the header and the footer. It has three styles, default header, default footer and transaction header . The styles for the header also belong to headers in line displays.
-
Deals: Here you can configure styles for Deal Headers. It has two styles, header and voided header. Note: To display the Deal Headers on the chits in the KDS, you must select the Show Deals check box in the relevant Visual Profile.
The KDS Aggregate Profile defines which items and/or ingredients should be summarized on a Display Station to show what is in line on the station at any given time. Aggregates are calculated for items, modifiers and recipes.

When an aggregate for recipes is calculated, make sure that all the ingredients have the same unit of measure, otherwise the information in KDS gets confusing.
To create an aggregate profile:
- In Site Manager go to Hospitality > Configurations > Aggregate profiles. Here you can create a new aggregate profile and view its aggregate groups.
- In the upper pane of the view, you can create new aggregate profile or edit an existing profile.
- In the lower pane of the view, you can assign aggregate groups to the aggregate profile.
Aggregate profiles have a Time Horizon which is used to see how many items are due within the next N minutes on the Display Station. The profiles then have one or more Aggregate Groups which define which items to count on the Display Station. An example of an aggregate group would be a STEAKS group, which would count all steaks (Sirloin & T-Bone) that are sent to the Display Station.
The Aggregate Profile is assigned to a Display Station, so it is possible to have a Coffee station which has an Aggregate Profile AGR-1 which shows a Coffee group, Espresso group, and so on. Another Display Station could have another profile AGR-2 showing a Steaks group.
To create an aggregate group:
- In Site Manager go to Hospitality > Configurations > Aggregate groups. Here you can create a new aggregate group and view its group items
- In the upper pane of the view, you can create new aggregate group or edit an existing group.
- In the lower pane of the view, you can assign items to each aggregate group.
The aggregate groups can either use the time horizon, set on the aggregate profile, or not.
-
Using a time horizon will show the X number of items on the station that are due within the next n minutes (Time Horizon) and the Y number of items that are due later will be shown in parenthesis. An example of this for a steaks group would be: STEAKS 3(5). This means 3 steaks are due within the time horizon and 5 are due later, on the Display Station.
- Not using a time horizon will simply show the X number of items on the station in the Aggregate group. An example of this for a steaks group would be: STEAKS 8. This means 8 steaks are on the Display Station.
If the Aggregate Pane is set to visible in the Visual Profile, the Aggregate groups are shown in the pane and not in the Display Station Header.

When you create aggregate profiles and aggregate groups, you have to be aware of what display stations the items are routed to and have in mind what display stations the profiles are created for
See also
| Last updated: | August 2020 |
| Version: | LS One 2020.1 |

